0121 271 0221

How to Light a Stove or Log Burner
Get the flames roaring and your room nice and toasty in no time at all. Follow our tips and advice on how to light a stove.
Wood-burning stoves have become incredibly popular over the past few years. But lighting a stove is still relatively new to most of us. Lighting a wood-burning stove or multi-fuel stove correctly will not only save you a lot of frustration, it will also help you to save money, get better heat output from your stove and limit the amount of smoke in your room. Let’s look at how to light your log burner.
Light Your Log Burner or Stove - in 7 Simple Steps
Step 1. Gather the right materials to burn
Step 2. Prepare the stove
Step 3. Light the stove
Step 4. Manage the stove airflow
Step 5. Close the stove door
Step 6. Maintain the fire
Step 7. Put the fire out
Light Your Log Burner or Stove - in 7 Simple Steps
Like driving a car, lighting a stove is incredibly easy once you know what you’re doing. You can quickly and efficiently light a log burner by following these 7 simple steps.
Step 1. Gather the right materials to burn
Lighting a stove is much easier if you’ve got the right materials at hand. To light your stove, you will need:
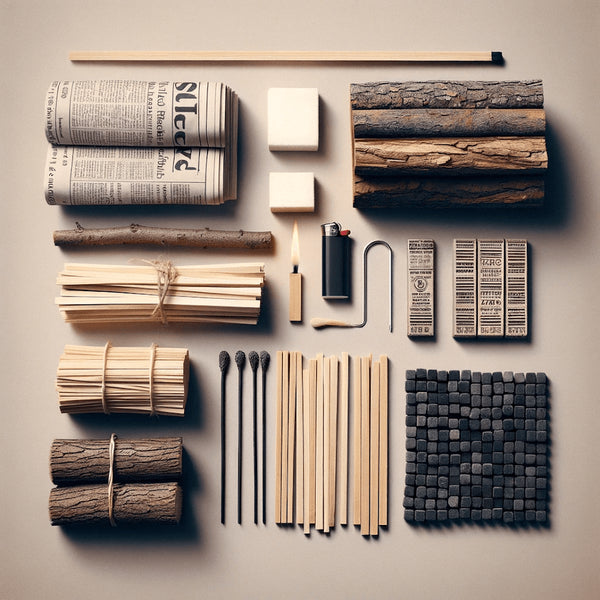
Newspaper
Scrunched-up balls of newspaper burn quickly to get your fire started.
Firelighters (optional)
If you don’t want to rely on newspaper, firelighters will also get the fire started quickly.
Kindling
Very dry sticks or other small bits of wood that light faster than logs to help the fire to get going.
Well-seasoned or kiln-dried logs
To keep the fire lit, you’ll need to burn logs with a moisture content of 20% or less.
Smokeless fuel
If you’re using a multi-fuel stove and not burning logs, you’ll need smokeless coal to fuel your fire.
Long matches or lighter
To provide that crucial first spark.
Which fuel should I burn?
Wood
For your stove to burn well and efficiently, you should always choose logs that are very low in moisture. This means wood that’s been cut, chopped and well-seasoned for a year or more. Alternatively, you could choose logs that have been kiln-dried.
Using wood that isn’t seasoned is bad for your stove and your pocket. Logs with a higher moisture content create more smoke, which turns into creosote and clogs up your stove system. Unseasoned logs also waste energy that should be heating your home on evaporating moisture.
When choosing the best wood for a woodburner, you can choose either hardwood or softwood. Hardwoods, like oak and ash, are more dense. That means they give a longer, more efficient burn. Softwoods, like cedar and birch, are less dense and burn more quickly. That means they also light more easily.
Smokeless Fuel
On a multi-fuel stove, you can also burn smokeless fuels as well as logs. Smokeless fuel comes in the form of briquettes or coals made from anthracite, similar smokeless coals, or waste material from plants. Popular brands of smokeless fuel that are suitable for multi-fuel stoves include Phurnacite, Taybrite, Ecoal and Homefire.
Regular household coal is not suitable for use on a multi-fuel stove. It is too volatile, and burning it risks causing damage to your stove.
Safety Tip - To protect yourself, your home and your stove, only use the correct materials we’ve outlined above to light your stove. Never burn household waste and never use flammable liquids to start a fire in a log burner.
Step 2. Prepare the Stove
Clean the stove
A stove lights more easily when it’s clean because this helps air circulation. A shallow bed of ash helps wood to burn in a log burner, but most of the ashes can be removed. In a multi-fuel stove, you can clear all the ashes from the grate and ash pan.
Day-to-day that will be sufficient, but once a month or so you can do a deeper clean to maintain efficiency:
- Remove the baffle plate, grate, fire bricks and ash pan.
- Use a vacuum cleaner to clean all the ashes from inside your stove.
- Use wire wool and a scraper to remove any sooty deposits.
- Clean the fire bricks and baffle plate with a soft brush.
- Refit the baffle plate, grate, fire bricks and ash pan.
Open the air vents
Next, fully open the air vents on your stove. The air vents are there to give you control over how much air is able to get into the stove at any time.
To light the fire, you’ll need air flowing through your stove to provide oxygen to feed the fire. At this stage, you want as much air as possible to get your log burner going.
Open the damper
Not all flues have a damper. If yours does, you should open it while lighting your stove. A damper is a small plate that can be controlled to close off your chimney to stop excessive draught. You’ll usually find a lever at the side of the flue — or occasionally the stove itself — to control the damper.
Similar to the air vents, you want to open the damper to let as much air get into the stove as possible at this stage.
Once the stove is lit, the damper should never be fully closed because the draw of air up the flue is crucial to how a woodburner works. Closing it fully will cause an efficient burn, excess smoke and a build-up of creosote in your stove and flue.
Heat the flue
If your stove hasn't been lit for a while, you can warm up your flue to make the lighting process. To do this, take a sheet of newspaper, fold it to be roughly the same width and depth as your stove and light it. The intense burn of the paper will help to move any pockets of cold air that are sitting in the flue.
Some people prefer to roll newspaper and hold it up the inside of the flue, but this isn’t usually necessary.
Safety Tip - Lighting the newspaper to heat the flue will also indicate if there are any blockages in the chimney. If there’s a poor draw and smoke fills the stove, your flue might need to be swept. Look also for lumps of creosote or black liquid — also indications of blockages in the flue.
Step 3 - Light the Stove
Now it’s time to light the stove. To prepare for that, you’ll need to find the most efficient way to arrange your kindling and fuel. Let’s see how you can achieve that.
How to light a log burner
Before lighting your log burner, you first need to build your fire. There are various ways to arrange the kindling and logs to light a log burner. Some people prefer a ‘top-down’ approach and add firelighters, newspaper and kindling on top of logs. Others favour a bottom-up approach and only add the logs to the top once the fire is going.
Should the kindling be casually strewn, placed in a lattice shape or built up like a wigwam? It’s about experimenting to see what works best for you. Here’s our preferred approach:
- Scrunch up several sheets of newspaper into balls and place a few into the stove.
- Take 8-10 pieces of kindling and criss-cross them on top of the newspaper to make a lattice effect.
- Push the remaining balls of newspaper into gaps between the sticks.
- If you’re using firelighters, you can also place these on top of the newspaper in gaps between the sticks.
- Your log burner is ready to light.
The reason we prefer to criss-cross the kindling to create a lattice is that it’s important that the air can flow around and between the sticks. This will encourage the fire to grow and ultimately help the logs to set alight.
How to light a multi-fuel stove
If you’re burning logs on a multi-fuel stove, you can use the same process as for lighting a log burner. If you’re burning smokeless fuel, make sure to empty the grate and ash pan of ashes because the smokeless fuels burn best with a good circulation of air from beneath.
- Add a small amount of your preferred smokeless fuel to the grate to create a stable firebed for your fire.
- Scrunch up several sheets of newspaper into balls and place a few on top of the smokeless fuel.
- Take 8-10 pieces of kindling and criss-cross them on top of the smokeless fuel and newspaper to make a lattice effect.
- Push the remaining balls of newspaper into gaps between the sticks.
- If you’re using firelighters, you can also place these on top of the newspaper in gaps between the sticks.
- Your multi-fuel stove is ready to light.
Light and grow the fire
Once you’ve completed the steps above, it’s time to light your stove. To do this, take a long match or lighter and light the firelighters or kindling at the centre of the stove. Leave the stove door ajar to allow plenty of oxygen into the stove at this stage.
If you’re burning wood, once the kindling is burning well and starting to char, you can add larger logs to the stove. Using a stove glove, place the logs in a way that allows air to continue to circulate to avoid extinguishing the kindling and encourage the logs to light. Keeping the door ajar will help the logs to set alight.
If you’re burning smokeless fuel, it's a similar process. Once the kindling is starting to char, the small amount of smokeless fuel you added should be starting to burn and glow. At this stage you can start to add more smokeless fuel, taking care to maintain gaps for air circulation and not adding so much fuel that the fire is extinguished.
Step 4 - Close the Stove Door
Once your logs or smokeless fuel have started to burn, you can close the stove door properly. This is important to maintain efficiency — making your fuel last longer and saving you money — as well as preventing overfiring. This is when your fire burns at too high a temperature and causes damage to the stove and flue.

Step 5 - Manage Airflow
Following on from closing the stove door, you can take further steps to manage airflow to improve efficiency and avoid overfiring. You can do this by adjusting the air vents. While having them fully open is vital for the lighting process, you can limit the air supply once the stove is properly lit. This will slow the pace at which the fuel burns.
Experiment to find the optimum position for the vents to limit the airflow without causing the fire to smoke or smoulder too much. Fully closing the vents will extinguish the fire, of course. If your stove has a damper, you can follow the same principles as for the air vents.
You might need to adjust the air vents or damper again while your stove is in use. When adding new fuel, if the wind picks up outside or if you’ve previously restricted airflow too much, you might need to readjust the airflow.
Step 6 - Maintain the Fire
Now you can sit back and enjoy the fire, but it’s important to keep an eye on your stove. Firstly, for safety reasons, you shouldn’t leave the fire unattended. Secondly, you need to monitor when to add more fuel.
Generally, you should avoid adding extra fuel too often. Wait until your fuel is burnt well down before adding more. Even if the flames aren’t spectacular, the fire will still generate plenty of warmth to heat the stove (which in turn heats your room).
You’ll save money by waiting for the fuel to burn down before adding more. It also gives you greater control over the heat output, which is useful because too much fuel is another cause of overfiring.
If you have left it too long before refuelling, you can always open the air vents slightly to allow more air into the stove.
Step 7 - Put the Fire Out
When you’re ready to put your fire out, the best option is to let the stove gradually die out so that you get the benefit of all of the heat available. Once the fire has burned down to embers, you can close the air vents (and the damper if you have one).
Closing the vents will quickly cut off the air supply and extinguish the fire. Make sure the fire is completely out, and the stove is cooling down before leaving it unattended.
Once the stove is completely cold, which might be the next day, you can perform a visual check to make sure there is no damage to the ashpan or internal parts and that the stove is ready for its next use.
To check on any safety considerations or the best way of operating your stove, please check your stove manual.
Additional Safety Tips
Safety is the most important thing when using your log burner or multi-fuel stove. Stoves operate at very high temperatures and create potentially dangerous gases. Therefore, you should always take steps to keep yourself and your household safe:
- Read the Manual - Nobody knows your stove better than the manufacturer. Check your stove manual to see how to safely operate your stove.
- Keep Combustibles Away - Keep flammable furniture, curtains and any other combustible materials well away from your stove. The high temperatures risk igniting flammable materials.
- Use a Fire Guard - Keep children, pets and any vulnerable members of your household safe by using a fire guard. This will help to keep everyone at a safe distance from the stove.
- Ensure Proper Ventilation - Use a reputable installer and make sure the amount of ventilation in your room is in line with the stove manufacturer’s guidelines and Building Regulations.
- Never Overfill - Adding too much fuel could make your stove dangerously hot. Also, avoid filling smokeless coal above the guard at the front of the stove to prevent hot fuel from spilling out when the door is open.
- Don’t Leave Your Stove Unattended - Keep a close eye on your stove so that you can monitor it at all times.
- Use Tools and Gloves - Lit stoves are very hot. Use a stove mitt or gloves and a companion set to safely tend to your log burner.
- Disposing of Ashes - Ashes remain hot long after the stove has gone out. Use a metal bucket if disposing of hot ashes, and don’t empty them until they have completely cooled.
- Install Alarms - A carbon monoxide alarm is a legal requirement when you have a stove. It’s also a good idea to have a smoke alarm installed.
- Regular Maintenance and Servicing - Keeping your stove well-maintained and regularly serviced will keep it in good working order and minimise safety risks. Getting your chimney swept to remove build-ups of creosote is a prime example.
Stove Fire Lighting FAQs
Final Thoughts
Lighting a log burner can be frustrating when you’re not used to it. Try to embrace the challenge and enjoy the experimentation of finding the approach that works best for you and your stove.
You can follow the steps we’ve outlined above as your starting point. Even if you try something slightly different, a combination of newspapers, dry kindling, dry fuel and a good supply of air will give you the best results.
About Gr8Fires
We’ve been selling log burners, multi-fuel stoves and other heating products for more than 30 years and through our online store since 2009. We focus on bringing incredible cosiness to homes across the country by offering high-quality heating appliances at the lowest possible prices.
Take a look at our range of woodburners and multi fuel stoves to find the best stove for your home.